How to Set Up Conversions in GA4 (Key events)
- Home
- Knowledge Sharing
- How to Set Up Conversions in GA4 (Key events)
Understanding how users interact with your Website is essential to making informed business decisions. Google Analytics 4 (GA4) offers robust conversion tracking that goes beyond simple page views, allowing you to measure specific actions that determine success. This article will walk you through setting up conversions in GA4, ensuring that you will capture valuable data to enhance your marketing efforts.
Why Conversions (Key Events) Matter in GA4
In today's data-driven world, it's important to understand user behavior beyond a simple website visit. While metrics like page views give us insight into website traffic, they don't tell the whole story. This is where change comes in. Changes in GA4 Users represent specific actions that indicate the success of your business, such as purchases, registrations, or downloads.
You can measure the effectiveness of your marketing campaign, see how users navigate your website or app, identify areas of improvement in your marketing funnel, and calculate the long-term value of each customer in for your business by focusing on change in GA4, you truly You receive a clear picture of what matters and empowers you to optimize marketing efforts to achieve performance real progress.
Setting Up Conversions (Key events) in GA4: A Step-by-Step Guide
While GA4 offers built-in change tracking, you may encounter situations where Google Tag Manager (GTM) is a valuable tool. If you need to set up complex post-conversion rules or manage tags for different marketing channels, GTM provides a central place to view and use these tags without changing your website code for an SEO campaign . This can be especially helpful for those who are not technical experts or frequently used code updates are difficult.
The gtag.js tag is the basis for tracking your website. When you add this code to all your pages, GA4 will start recording the required visitor data automatically. Google Tag Manager (GTM) simplifies this process, allowing you to install gtag.js tags and set up your GA4 account ID with just a few clicks.
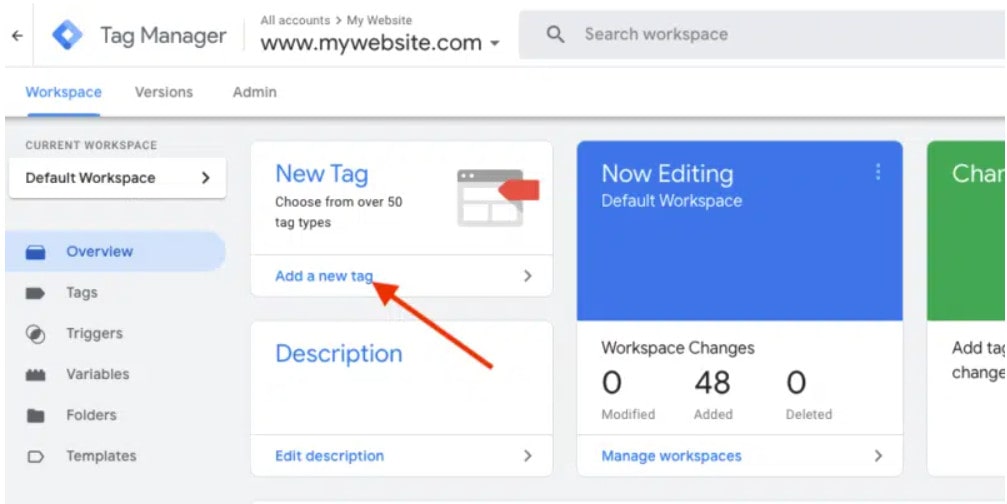
Step 1:
Within Google Tag Manager (GTM), navigate to the account and container you want to use. There, click the button "Add a new tag" to begin setting up your GA4 tracking.
Step 2:
After clicking "Add a new tag," you'll be presented with a menu of tag types. Choose the option labeled "Google Analytics: GA4 Configuration" to define how GA4 tracks data on your website.

Step 3:
A box will appear where you can enter your Measurement ID. Locate this ID within your GA4 account and copy it here. Saving this tag creates a shortcut for future GA4 event setups – you can simply select it from a dropdown menu instead of searching for the ID repeatedly.
For most users, keeping the option "Send a page view event when this configuration loads" checked is recommended. This ensures GA4 automatically tracks pageviews whenever a user visits a new page on your website.
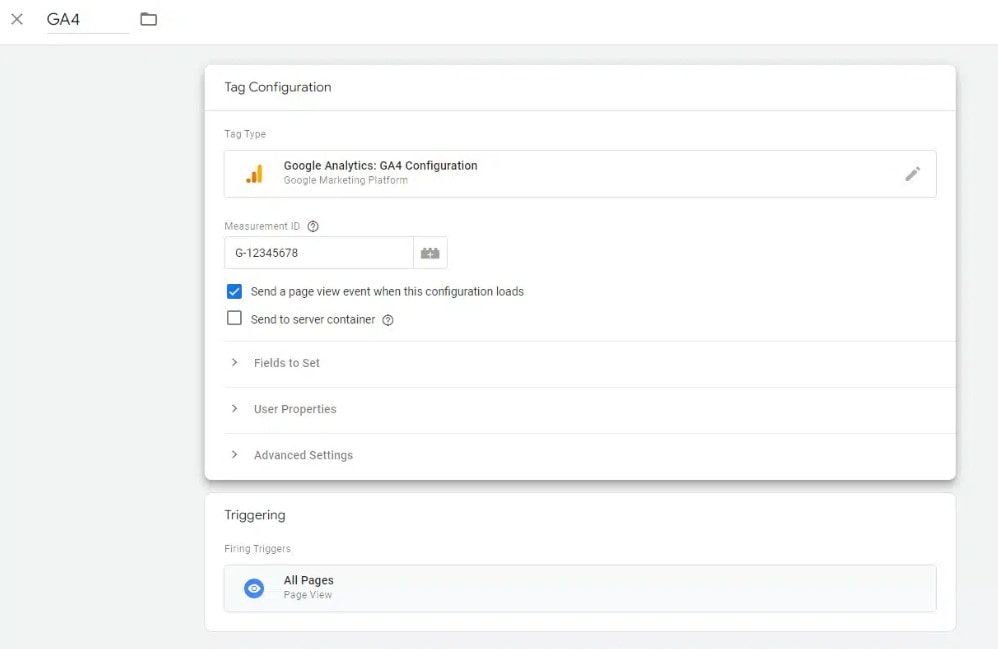
Step 4:
Next, go to the "Triggering" section and specify where the GA4 tag triggers on your website. Generally, you want it to track activity across all pages. However, you may have specific areas that you want to exclude, such as privately accessible sections.
GTM provides flexibility through its regulatory framework. You can set rules based on URL paths, click on specific elements, etc., ensuring that tags only load where necessary.
Step 5:
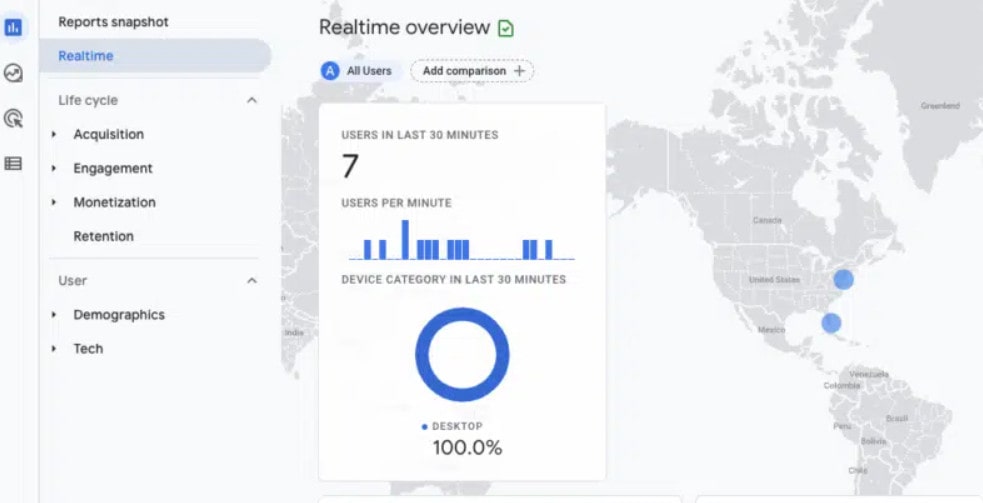
After saving the tag, don't forget to publish your GTM container to make the changes active on your website. With that done, GA4 should be up and running! To verify if it's tracking sessions, head over to the Realtime section in Google Analytics. You should see your own visit appear shortly after you visit your website.
Building Your GA4 Event Tracking with GTM
Unlike its predecessor, Universal Analytics, GA4 prioritizes event-based measurement. It provides built-in monitoring for common user interactions such as scrolling, outgoing clicks, downloads, and video viewing. This can be activated directly with Enhanced Measurement in GA4.
However, these attachments have limitations compared to what you can do with Google Tag Manager (GTM). For example, scroll tracking only fires a single "scroll" action when the user reaches the bottom (about 90%). You wouldn't know where you started scrolling. GTM shines here. It allows you to shoot events with specific details, such as trigger events at different scroll depths (25%, 50%, etc.) for more granular analysis.
The real power of the GTM lies in its flexibility. You can fire events for a wide range of user actions, not just basic interactions. While we'll use scroll tracking as an example here, the GA4 Event tag in GTM works with any trigger available, allowing you to capture a wide range of user actions and tailor your tracking to your specific needs.
In the following steps we will demonstrate how to use Google Tag Manager (GTM) to set up custom events in GA4, using form submission ("form_submit") as a practical example.
Step 1: Set Up Your Event
With GTM connected to GA4, let's create a tag that tracks user clicks on the submit button.
- Start by clicking "New" under the "Tags" section.
- Give your tag a descriptive name, like "Track Contact Form Submission."
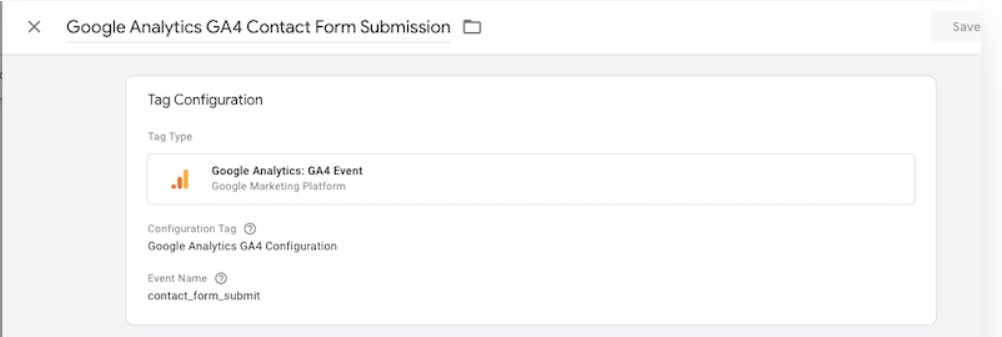
- Click the central gray button and choose "Google Analytics: GA4 Event" from the list.
- Under "Configuration Tag," select the GA4 configuration tag you created earlier.
- Name your event clearly, for example, "contact_form_submit."
- Finally, click "Add Trigger" to define when this tag fires.
Now, let's define when this tag should actually fire. This is done through a "trigger."
- Click on "Triggering" within your newly created tag.
- Click "New" to create a fresh trigger.
- Give your trigger a clear name, like "Contact Form Submitted."
-
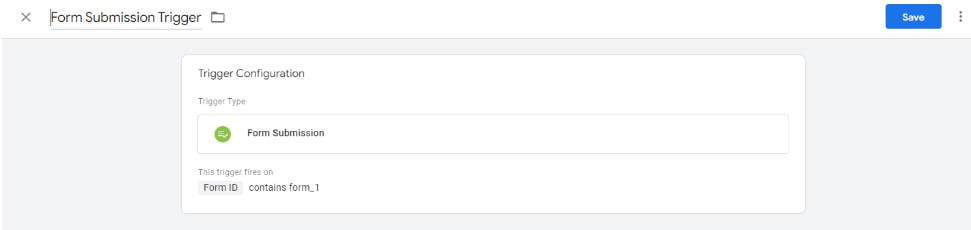
Choose the trigger type that best suits your situation. Since this form doesn't redirect to a thank you page, we'll use options related to the form itself.
- Option 1: Select "Form Submission" as the trigger type. This will fire the tag whenever the form is submitted.
- Option 2: If your form uses a unique ID, choose "Element Visibility" and locate the form's ID (e.g., "form_1" in the image below). This will fire the tag when the form becomes fully visible after submission.
No matter which option you choose, save both the trigger and the tag configuration for your changes to take effect.
Step 2: Publish Changes in GTM
Now, to activate these changes on your website, click the "Publish" button. This will push the updates live, allowing you to start tracking form submissions with your new GA4 event.
Step 3: Test the Tracking
Before publishing changes to your live website, you can take advantage of GTM's preview mode to test your setup. This ensures everything works as intended.
- Click the "Preview" button within Google Tag Manager.
- Enter the URL on your website where the form you're tracking resides.
- Fill out the form completely and submit it.
- Switch to the "Debug View" in GTM. This will display a log of events triggered during your test submission.
- Look for your newly created event (e.g., "contact_form_submit"). If it appears in the debug view after submitting the form, your tracking is working correctly!
Troubleshooting Tips:
If you don't see the event firing, don't worry! Here are some troubleshooting steps:
- Double-check the variable: Make sure you've selected the correct variable that identifies your specific form (e.g., form ID).
- Refine your trigger: Depending on your form behavior, you might need to adjust the trigger type (e.g., "Form Submission" vs. "Element Visibility").
- Retest: Once you've made changes, rerun the test using the preview mode to confirm if the event fires successfully.
By following these steps and troubleshooting tips, you can ensure your GA4 event tracking for form submissions is functioning properly before making it live on your website.
Step 4: Verify Data in GA4
Once you have confirmed your changes, go to your GA4 property and go to the "Events" section. Finally, you should see the registered mailing form appear.
Keep in mind: There might be a slight delay (up to 24 hours) before the conversion data shows up in GA4. This is normal, so don't be alarmed if it doesn't appear instantly.
For an extra layer of reassurance, check the conversion reports under the "Conversions" (Key events) section. This will confirm that your form submission events are being accurately recorded. Now you can sit back and relax, knowing your GA4 is tracking valuable form submission data!
While there may be a short wait (up to 24 hours) for form submission data to populate in GA4, your patience will be rewarded. Go to the "Event" and "Conversion" sections to confirm a successful search. You now have valuable insight into user behavior, empowering you to optimize your website and marketing strategies for greater success!
GA4 Conversions Setup FAQs
What naming conventions should I use for GA4 events and key events?
Use lowercase with underscores (e.g., lead_submit, add_to_cart) and keep names action-oriented. Standardize parameters like value, currency, content_type, and form_id so reports and explorations line up cleanly. Document the schema in a shared sheet so marketing, dev, and analytics teams implement the same spellings.
When should I rely on GTM versus hard-coding gtag?
Use GTM when you need agility frequent rule changes, cross-channel pixels, and granular triggers without code deploys. Hard-code gtag for performance-critical or privacy-sensitive events that must fire even if the container is blocked. Many teams run a hybrid: core events via gtag, marketing and testing via GTM.
How do I pass meaningful context with events (parameters vs. user properties)?
Attach per-hit details (e.g., plan_tier, coupon, form_name) as event parameters; they describe this action. Reserve user properties (e.g., subscriber_status) for stable attributes that change infrequently. Keeping context in the right place reduces messy dimensions and speeds up analysis.
What are the most common GA4 conversion (key event) mistakes to avoid?
Marking too many events as conversions inflates totals and muddies attribution limit to true business outcomes. Duplicating the same key event across multiple triggers causes double counts; de-duplicate with precise conditions. Forgetting value and currency on monetized actions weakens ROAS/LTV analysis.
How do consent and privacy settings affect conversion tracking?
If Consent Mode is in play, GA4 may model conversions when consent is denied, which changes totals versus raw hits. Make sure your CMP integrates with GTM/gtag and test each consent path in DebugView. Keep a note in reports indicating where modeled data is expected to avoid misinterpretation.
What’s the right way to test events before marking them as conversions?
Validate in GTM Preview/Tag Assistant, then confirm in GA4 DebugView that parameters arrive as intended. Use a staging label (e.g., test_) during QA, and only rename to the production event once verified. After publishing, check the Realtime and standard “Events” cards for at least one full user flow.
How do I handle cross-domain conversions (e.g., site → subdomain checkout)?
Enable cross-domain measurement so GA4 preserves the same session and user across hostnames. Confirm that your GTM/gtag configuration lists every domain involved in the funnel. Re-test attribution paths; fragmented sessions are the top reason for “missing” conversions.
Should I migrate Universal Analytics goals one-to-one into GA4?
Treat migration as a cleanup opportunity, not a lift-and-shift. Map UA goals to GA4 events only if they reflect outcomes you still care about, and consolidate overlapping micro-goals into a single meaningful key event. You’ll get cleaner reporting and fewer conflicting signals.
How do data thresholds and modeled conversions impact reporting?
In some views (especially with Google signals enabled), GA4 applies thresholds for privacy, which can hide rows or alter totals. Modeled conversions can fill gaps but differ from directly observed hits. Add footnotes to dashboards explaining where thresholds/modeling apply, and use BigQuery exports for un-sampled, row-level analysis when needed.
What’s a lightweight governance checklist for healthy GA4 conversion data?
Monthly: audit the list of key events, remove stale ones, and confirm values/currencies. Quarterly: spot-check cross-domain flows, parameter coverage, and consent paths; refresh your event dictionary. Before new campaigns: run end-to-end QA in Preview/DebugView and log evidence (screens + event payloads) for analysts.